DIY Tufted Headboard

This is a project I did from years ago.

I loved this West Elm headboard but since I was on a tight budget, I decided to go to Jo-Ann’s fabric store to try and make one myself.

I started out with two large 16×20 artist canvases I had gotten for free. I used simple brackets to piece them together into one big piece. Then, I stapled foam, batting and grey fabric into place. The finishing touch? Grey-fabric buttons from Jo-Ann’s button kit for just $3.79.

dsc04114-1

Voila. A simple headboard under  $70.

dsc04115-1

And here it is, all dressed up.

img_4290j


Before/After: Bathroom

Okay, so I wish this were my before/after bathroom remodel but it is not. I am not a famous design blogger and I did not win HGTV Design Star. This is Emily Henderson’s amazing bathroom remodel and I love the blue tile and brass accents. Someday, I will have enough funds to do a complete bathroom gut but today is not that day…

According to this Houzz article, a bathroom remodel can run anywhere from $3,000-$12,000 for a basic update and all the way up to $100,000+ if you want to get really fancy. No can do.

Still, I didn’t want to be stuck with yellow and pink tiles (although I must say there are some bathrooms that ROCK the retro like Kate’s pink bathroom here.)

I was going for a more clean, modern look so decided a more affordable option would be refinishing the tile. I was very tempted to DIY it. Ashley from Domestic Imperfection shows you how. But I decided to go with a professional at Nice Tub and Tile solutions. Michael did a great job and we were very happy with the results.

BEFORE:

AFTER:

So FRESH & SO CLEAN, CLEAN…

img_2981-1

Now if only I could have a self-cleaning bathtub…

Before/After: The Living Room

So this is what our living room looked like before we moved in.

BEFORE 

Source: Pics from real estate listing

AFTER

screen-shot-2016-10-08-at-6-10-15-pm

Day

screen-shot-2016-10-08-at-6-11-15-pm

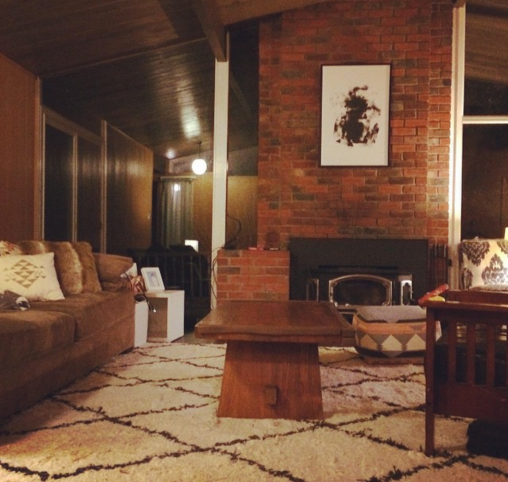
Night (with our old furniture)

This wasn’t too much of a DIY project but we did replace the stained blue carpet with dark hardwoods, took down the moldy drapes and changed the furniture layout in the room. I think this layout opens up the room alot more and makes the fireplace more of the focal point.

Our color scheme for decor is gray, blue and white. It’s funny because I didn’t necessarily plan this out but those are the colors I gravitated to and they just worked together. Because I am so budget-conscious, I wanted to create a cost breakdown for the furniture and room decor:

TOTAL COST: $2453.99

Moroccan Shag Rug: $418 with 70% off discount (Similar) Rugs USA

For a 9×12 rug, I think this is a pretty good price. I love how it adds a really cozy feeling to the more structured and modern furniture shapes. West Elm sells a similar rug for $1,099.

Arc Lamp: $124 MyHabit.com (They’ve closed and now they are just Amazon.com)

I realize this is a knockoff but couldn’t afford the original $2,995 price tag from DWR. I thought this was the perfect replica. The quality is pretty good and it looks perfect in the living room.

Karlie sofa: $629 Macy’s

I’ve had really good luck with Macy’s sofas. Our other sofa from Macy’s lasted 7 years and is still going! They had this in a beautiful poppy color but knowing how fickle I am, I decided gray would be more practical and I could just add color with pillows and throws.

Throw pillows: $8 for pillow covers from Ikea,$30 Threshold blue lumbar pillow from Target

Shag rug (used as throw): $14.99 from Ikea

Coffee table: Old but purchased years ago for $30 at Goodwill in San Francisco

Cloud sofa: $0 for sofa but around $1200 to reupholster. Sofa from Modernica

I saved the best for last because this was such a great steal. A neighbor wanted to get rid of this and I wanted to give it new life and took it to Torres Custom Upholstery. They are AMAZING. Jose helped me pick fabric and we decided on using outdoor upholstery fabric since I wanted a white sofa but have a toddler. (Great combination, I know!) But get this, when the movers got the fabric a little dirty from carrying it in , Jose didn’t just try to take the dirt off, he actually re-upholstered the whole thing AGAIN! I couldn’t be happier with their service and the result.

Here is the before and after:

screen-shot-2016-10-08-at-6-10-30-pm

Reupholstering does wonders!

So there you have it. That’s our little living room! It’s a work-in-progress but we’re pretty happy with it for now.

Fixing up a fixer-upper Eichler

This blog was created to document both the joys and frustrations of living in a 1960s Eichler home. We moved into our family’s first home in December 2014 and have been working on it a little bit at a time. It wasn’t a true fixer-upper but there were definitely some things we wanted to improve. Some of it was DIYed and some needed the help of an experienced contractor or a very handy (and kind!) relative. Here’s a little bit of what we’ve done so far.

  • Ripped out the old carpet and replaced with hardwood
  • Painted some of the walls white
  • Refinished the bathtub and shower
  • Replaced plastic switchplates with metal ones
  • Replaced some light fixtures and ceiling fans
  • Ripped out moldy drapes and replaced with blinds
  • Repaired an old fence
  • Fix the back deck

That’s all folks! One project at a time.